Wednesday, October 10, 2018

Prop Flange Extension

This will be a quick post - as part of my power plant setup, I'll be using a 4" aluminum spacer to help streamline my cowl around the engine. At my place of employment, I've got access to a CNC mill and a larger metal lathe, among other things. I was able to pick up a 5" diameter 6" long piece of 6061 aluminum for about $40 on Ebay, modeled what I wanted in CAD, then went to the manual lathe to turn it. I should have taken more pictures, but I didn't think about it; I do a fair amount of machining at work, and it all feels pretty routine anymore. The first picture I have is after I turned the stock down to final inside and outside dimensions, except for the face that will abut the flywheel. I set it up on a rotary table on the mill to get a bit more precision with the 6 prop-mounting holes, but that was probably overkill.


Spot drill, undersize drill, final drill, chamfer the edges. Not exactly rocket science. I intentionally left about an extra half inch on the end that I chucked up for the majority of the turning work, so that the marks left by the chuck wouldn't be on the final part. When I reversed it to turn the remaining face, I used some orange .050" plastic shim stock between the jaws and the part to avoid marring the finished surface. Turning the remaining face was straightforward, though I took light cuts to make sure I wouldn't pull the part out of the chuck. 


After the final lathe operation, I drilled the other 6 holes and cleaned up the part. Nothing left to do but put it away until the engine is ready to run... except test fit it on the flywheel.


Sunday, October 7, 2018

More Wood!

Ok, so I got the necessary braces installed. I also set up the seat well enough to take some measurements with a laser level simulating the horizon from my height when seated, and used that to generate templates for the canopy. However, in the meantime, there were a few more pieces of woodworking to attend to. The first is that, because of the way the fuselage is built, the plywood that stretches over the crossmembers behind the seat doesn't have a good way to glue to the longhorns.


The solution the previous builder used was to glue on more spruce to build the sides up to level, and it makes sense to me. So I went ahead and did the same. First I shaped some pieces of wood to follow the contours of the plane:


Then I glued them on, came back a day later, and started planing. I had to build up the center crossmember as well, because of the compound "dip" in the fuselage (Only needed about .02" or so, but it was easier to glue on a much thicker piece and plane it down later.) I used a hand plane held at an angle, so that the center x-member was being cut while the plane used the forward and rear x-members to set the height. Once the x-members were all co-planar, I planed the sides to match.


I didn't get a picture of the finished product, apparently. I was about ready to glue the plywood on, when I realized I'd want all of the gussets in place first; they'd be hard to add later! So I spent some time sanding tiny wood blocks to the right compound angles. It's not very difficult, but it was a little time consuming. I ended up needing 12; I was able to finish and glue 9 before I ran out of time.


The next time I was down, I finished making the gussets I needed and glued them overnight.


After everything had time to set, I planed and sanded everything down and cut the plywood to fit. This is pretty thin stuff, and I've found that by using a utility knife to cut through it, I can usually avoid sanding it except to break the sharp edges.


After several passes with the knife, it usually only needs a touch with sandpaper to get the edges smooth, and as long as you marked it right, it's bound to fit. All that was left was to glue it all together and clamp it down.


Next time I'm down, I'll pull the clamps off and start re-working the fiberglass seat backs. They need to be trimmed a little bit in order to fit the new angle. I'll probably cut the holes for the control sticks too, which will allow me to install those again and start fiddling with their location. I'm gearing up for all of the non-fiberglass things, since winter is almost upon us here. I've been working on designing a prop in CAD, as well as a control stick grip. Unfortunately, it looks like the canopy/aft deck/front deck is going to have to wait another winter... at least I have a plan for that now.

Wednesday, August 15, 2018

Whoops... This is a new problem!

Ok, ok, it's not really a problem... at least, it's not a mistake or a roadblock or a money pit kind of problem. The last few weeks have been pretty good - I finished assembling my heads,


made a plate for bolting the cylinders on to check deck height for each piston/cylinder set,


(btw, this gave me wacky results - I had to remake the plate to cover *both* cylinders at once, the same way the head will when the engine is assembled)


(Again, not like this.) and then made a new two-cylinder capturing plate and measured deck height at final torque.

Deck heights were all pretty darn close - I had a spread of 0.1997", 0.122", 0.1225", 0.125". Because I have a lathe handy, I was planning on chucking up the pistons and dusting them all perfect - but after doing the math, I realized that by arranging the heads correctly, my compression ratio would range from 7.976:1 to 8.021:1. In other words, a maximum difference of 0.045:1......... I think that's close enough!

I went ahead and painted the cylinder numbers on the case according to convention, and then marked the cylinders and pistons accordingly.


Since I wanted the heads on certain sides, I went ahead and marked them as well.


The last thing I have to do on the engine for now is bag everything up - each head will get a bag, each piston/cylinder will get a bag, and the block will get a bag. I don't want to have to carry the assembled engine up out of the basement when we move in a few months, so I'll just leave it in pieces until it's in a shop that's on the ground floor. After that, I'll assemble it and bag it again, until I need to take more measurements off it or am ready to attach it to an airplane. So what's the problem, you ask? Well, this engine has been about the only thing I can do related to my plane right now. Every couple weeks we travel to see the rest of my family, and I can sneak away for a few hours to work on the plane when we're there, but otherwise it's just me and the engine. Now that I'm mostly done with that, I'm not sure how I'll keep making progress... and if I'm not making progress, I'll drive my wife over the edge. :)

Thursday, July 26, 2018

Getting Ahead

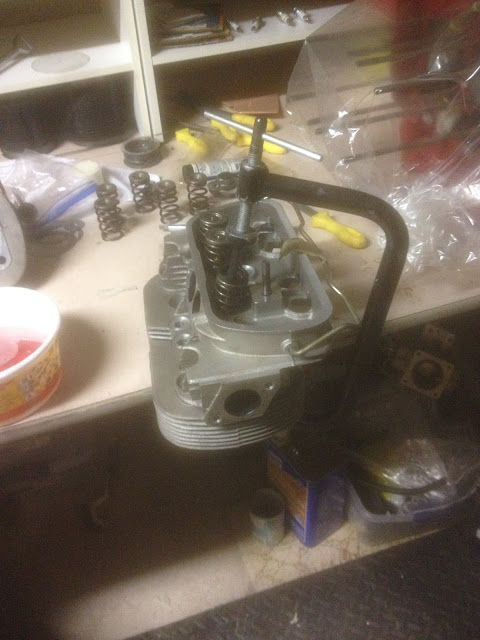
I was so excited to get past this hurdle - heads are finally (almost) in shape. I figured the best way to CC my heads was to install the valves and valve springs - turns out I was wrong*, but that's how I did it to start. Got them in pretty easy, once I figured out the tool:


I'm really, really opposed to buying single-purpose tools. However, there's really no way around this one - it was either this or some kind of press with a few hokey jigs, and I didn't have space for that nonsense.

Once I got the valves installed, I started prepping for the CC measurement process:


Ok, the first step is always to get the heads level. I figured the easiest way to do that was to set up the heads, then add shims until they were level. This turned out to be a huge project, because even with the heads just about perfect, air bubbles would still show up *not* directly under the hole in the plexiglas. So I'd have to start tipping the head, and by the time I got the bubbles where I needed them, the shims would have walked out of position and now the head isn't level anymore, and the bubbles zip off to some corner of the chamber. I spent more time re-stacking shims than I did on any other part of this project!

I failed to take pictures of the entire CC process - call me impatient, I just didn't want to stop what I was doing and get my camera out. I went through the process at least 3 times for each chamber, then averaged my results - which wasn't hard, considering my syringe only had 1cc graduations. I was still able to guesstimate quarter-cc accuracy though.


Final volumes were 56cc, 56cc, 56cc, and 55cc. I'm still not sure about the last one - but it was consistent, all three measurements showed 55cc on the dot. That was easy enough to fix with a rotary tool and a cutter, followed by a sanding drum to smooth away chatter marks. Now I've got about a quarter cc spread between all four chambers, which is definitely good enough for a VW.

I cleaned the heads and valves really well to make sure no shavings or abrasives remained, and then put them away for now. I need to measure the valve spring forces, but after that I can reassemble the heads and bag them for now.

Aside from matching all the chamber volumes, CCing the heads gives me the last unknown for my compression ratio equation. I've got 94mm cylinders with a 78mm stroke; that's good for 541.2918 cubic centimeters. I've got 56 cc's in the heads, and I want a compression ratio (CR) of 8:1. CR is calculated by adding the volumes of the cylinder, head, and deck height, and then dividing by the sum of the head and deck height. When I go through all that, I get a necessary deck height of 3.06mm, or about 0.120". Back in an earlier post, I made mention that with the cylinder shims that were on the engine, the deck height was 0.114"..... which is pretty close to what I want. I can add .01" by going with the next size up shim; if I felt really crazy, I could chuck up the cylinders and turn them down .004" to get exactly what I'm after. However, I'm so close to final assembly of all of these components, I don't want to risk damaging something - and I think being off a tenth on my CR is probably ok; the math I'm finding looks like I'd be splitting hairs over less than half a percent of my power.

*The easiest way to do it is smear just a little grease on the valves and on the valve seats, then push the valves in and give them a little turn to hold them in place. No leaks this way.

Thursday, July 5, 2018

Head Games

I walnut blasted my heads a few months ago, and I didn't oil the valve seats well enough to keep them from corroding a little. Nothing major, but enough that I needed to do more than lap the valves in. What follows is a good example of wasted time, wasted money, and a whole lot of frustration. In short, if you're looking to do valve seat work, skip the next two miserable paragraphs.

I looked into getting a valve seat grinding setup, and wow, are they pricey! So I found a site that sells just the stones for about $14 bucks apiece and set about making my own self-centering stone holder. I cut the head off of an old exhaust valve to use as a pilot, drilled a hole in a chunk of aluminum, which I then heated up with a propane torch and dropped the aluminum onto the exhaust valve/pilot. After it cooled, I used a collet to hold the assembly in the lathe and turned threads on the aluminum portion to match the grinding stones I'd purchased. I then took the 45° stone for the intake seat, screwed it onto my new tool, and placed the tool back in the collet, set up my top slide to the right angle, and used a diamond-tipped dressing tool to grind the stone perfectly concentric. I wanted to make sure I didn't impart any weird tilt to the tool while I was using my drill to spin it, so I pushed a piece of 1/4" fuel line over the end of the tool and connected the other end to the drill. This seemed to work ok, except that the rubber hose allowed the tool to vibrate and caused some chatter unless I was careful not to apply very much pressure.

I worked through all three stones, re-angling them with a diamond stone on the lathe between valve seats to make sure the angle stayed true. Once I got to the 45s, I started checking the seat width. It wasn't until then that I realized I was grinding non-concentric valves. Whoops. I took a break to do some research, and came across a company called Neway. It took me some time to build up the nerve to pay for the tooling needed, but in the end I caved and picked up the stuff. After cutting a couple of the seats, I can say with confidence that was the right decision. Here's a picture of a valve seat that's had the 15 and 75 degree angles cut in it with their cutters.


It's a little tough to see, but the red line is what hasn't yet been touched. At its thickest, it's about .053, and at it's thinnest, it's around .018. That's pretty bad! The good news is, with the Neway system, I've been able to recut the seats concentric with the valve guides, and I'll be moving on to CCing the heads shortly.

This is what all of my valve seats look like now:


That's an exhaust valve seat, so the width is about .01" wider than the intake seats. They all look a lot more concentric now, though, so it's time to put new Dykem on the valves and seats and try to fit them together. I wanted to check for even contact between all the valves and seats, but I didn't want to remove any material. I decided to use toothpaste instead of lapping compound, because it's still abrasive enough to remove the Dykem but not enough to carve material away from the seats.


With all the valves and seats marked up, I put toothpaste around the contact area of the valves, placed them in their respective guides, applied a little pressure and rotated them 90 degrees back and forth a few times. I was really impressed; every single one of my seats showed clean, even lines around the entire 45 degree face, and every single one of my valves showed even contact around the mating surface. Consider me sold - Neway cutters are the way to go!

The last thing I did was clean up the toothpaste as best as I could and hose down the valves and seats with WD-40. Tomorrow I'll bring the heads to work and clean them up again in the parts washer, and then I can assemble the valves and springs into the heads for good.


Saturday, June 30, 2018

One step forward....

Actually, no steps forward for a long time. It's been pretty quiet on here for a while now. I finished assembling the short block on the engine by adding the flywheel seal, oil pump, etc. and bagged the whole thing to keep humidity out while I worked on the heads. I took a break to work on some Christmas presents on the lathe, and then I broke the lathe, so that needed repair... after that I started trying to recondition the heads myself. I don't think that was a mistake; the way I went about it was a little less than ideal, which caused more problems than it solved. That's all for another post though; this weekend I'm back at the fuselage, and making some serious progress... backwards!

Two years ago, I received the canopy I ordered. There's a long story of assumptions, misinformation, betrayal, and pretty poor customer service, but the bottom line is I've spent the last two years trying to figure out if I can even use the canopy or if I need to buy another one. It's a Dragonfly canopy, but the folks who made it insisted on molding it out of thicker acrylic than the design calls for. As a result, it bends a lot less than I anticipated, and trying to force it to fit has been difficult. Along the way, I realized how uncomfortable the seat is, because of the angle the seat back rests at. All it needs is to lean a few inches back to be much better.

So the plan was to cut out and replace the existing crossmember and seat braces, leaving the plywood shelf in place.


Here I've got the line marked, and just in case the sides got any squirrelly ideas, I put a clamp around the old crossmember to keep the dimensions stable. I clamped a straightedge on my line and used a utility knife to score through the plywood. I removed a chunk from my new line forward to the old crossmember. 


Looking good so far. The next step is to cut and fit the new crossmember and glue it in place. I just need to look underneath to mark the angles, and...


Whoops. There's an unexpected turn of events! The longeron doubler doesn't go quite as far as I thought it did. This just became a much bigger project.......

So I'll be replacing the plywood after all. I don't have any pieces that size left, but I can still cut the new crossmember and put it a little further forward. I had hoped to gain 3.5", but I ended up settling for 2.75". It didn't take long to fit the new member, which installed quite nicely.


With that in place, I cut out the old crossmember and seat supports, sanded and planed the remaining bits of wood away. 

I cut and fit new seat members, glued them in place, and left them to cure. 


This was enough for now. I'll still need to add all of the gusset blocks, but my goal this weekend was to get the plane to a point where I could sit inside and take measurements on total height required above my head as well as instrument panel height. I'll do that tomorrow when the glue's had more time to set up. Once I get those numbers I can finish the templates for the canopy frame, which I'l work on when I come back down in a few weeks. In the meantime, I'll keep working on the valve seats.